
Looking for a comforting, hearty meal that’s packed with bold, delicious flavors? This taco soup recipe brings all the best elements of a traditional taco into one convenient, easy-to-make dish.
Imagine a bowl filled with savory ground beef, beans, tomatoes, and a rich blend of taco spices, simmered to perfection and topped with your favorite garnishes like shredded cheese, sour cream, and crunchy tortilla chips.
Whether you’re feeding your family on a busy weeknight or looking for the perfect game-day meal to serve a crowd, taco soup is the answer. It’s simple to make, easily customizable, and hits all the right notes of flavor and comfort.
In this post, you'll find...
Why This Recipe Works
What makes this taco soup stand out is its versatility and ease. It’s a one-pot wonder, meaning less cleanup and more time to relax while the soup simmers.

Ground beef or turkey, canned beans, corn, tomatoes, and taco seasoning come together in a single pot to create a filling and flavorful meal that’s perfect for any time of year. Plus, the ingredients are pantry-friendly, so you likely already have everything you need.

If you’re craving something cozy, this taco soup delivers all the warm, zesty goodness of tacos in a fuss-free, spoonable form.
For those who love customization, this recipe is a dream come true. Whether you prefer to keep it classic or want to spice things up with extra jalapeños or a dollop of creamy guacamole, taco soup offers endless possibilities.
You can swap out the protein for a leaner option like ground turkey or even go vegetarian by adding extra beans or tofu crumbles. The flexibility of this dish is a big reason why it’s become a beloved staple in many kitchens.
Taco Soup Ingredients
One of the best things about taco soup is that it uses simple, pantry-friendly ingredients that come together to create a rich, flavorful dish.
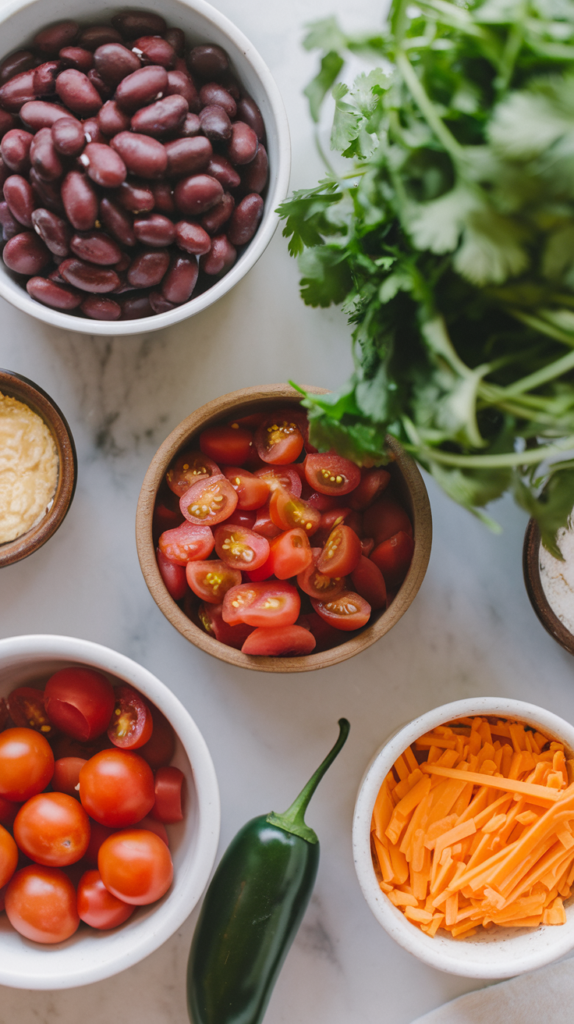
Here’s the list of ingredients with their measurements for the taco soup recipe:
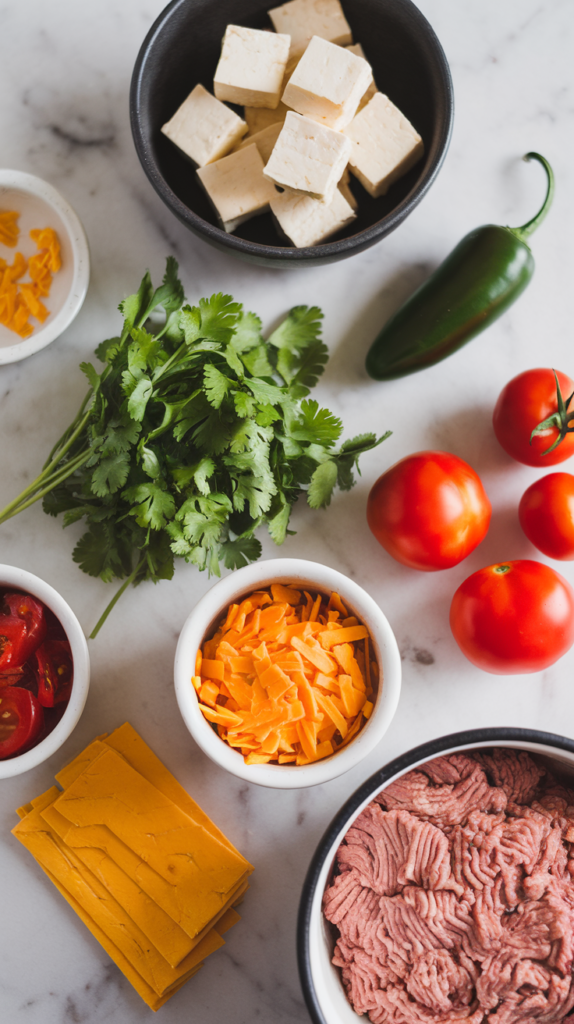
- 1 lb ground beef (or ground turkey/chicken for a leaner option)
- 1 packet (about 1 oz) taco seasoning (or homemade equivalent)
- 1 medium onion, diced
- 2 cloves garlic, minced
- 1 can (14.5 oz) diced tomatoes (fire-roasted for extra flavor, if desired)
- 1 can (8 oz) tomato sauce
- 1 can (15 oz) black beans, drained and rinsed
- 1 can (15 oz) pinto beans, drained and rinsed
- 1 can (15 oz) corn kernels, drained (or use 1 ½ cups frozen corn)
- 2 cups chicken broth (or beef broth for a richer flavor)
- 1 can (4 oz) diced green chilies (optional, for extra spice)
- 1 teaspoon olive oil (for sautéing onions and garlic)
- 1/2 teaspoon salt (adjust to taste)
- 1/4 teaspoon black pepper (adjust to taste)
- Optional: 1 jalapeño, diced (for heat, optional)
Toppings (optional but recommended):
- Shredded cheese (cheddar or Mexican blend)
- Sour cream
- Avocado slices or guacamole
- Fresh cilantro, chopped
- Tortilla chips or strips
- Lime wedges
- Sliced jalapeños (fresh or pickled)
Using Alternative Proteins or a Vegetarian Version
Ground beef is the classic choice for taco soup, giving the dish a hearty, savory base. The fat content of the beef helps enrich the soup, making it more satisfying and flavorful.
- Lean version: For a leaner option, you can substitute ground turkey or ground chicken, which will still provide a similar texture with fewer calories.
- Veggie version: For a vegetarian version, you can skip the meat entirely and use extra beans, or try adding crumbled tofu or a plant-based ground beef alternative like Beyond Meat. These options still provide the hearty texture taco soup needs while keeping it plant-friendly.
How to Make Taco Soup
Now that you’ve gathered all your ingredients, it’s time to bring everything together into a warm, comforting pot of taco soup.
Step 1: Brown the Meat
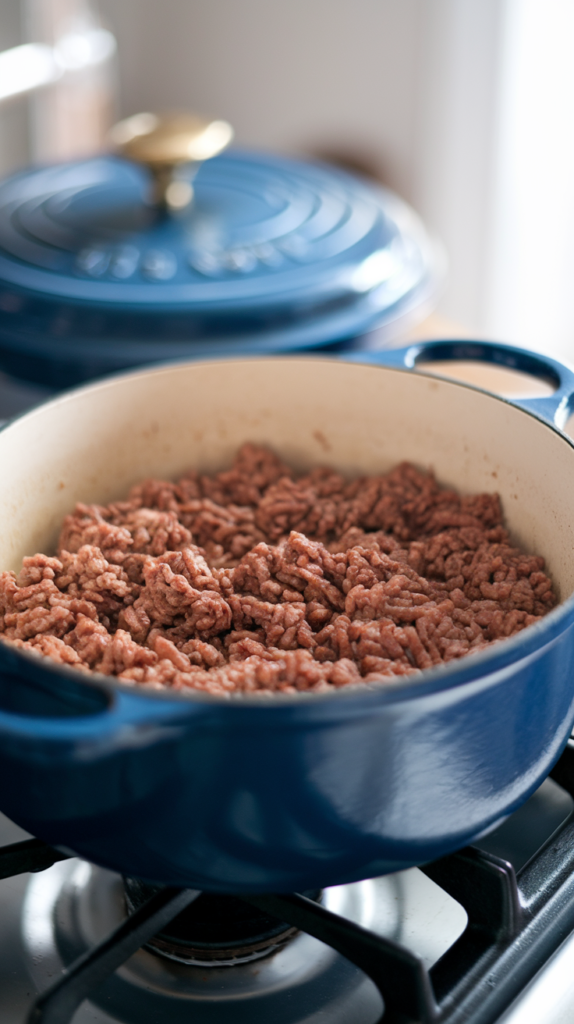
Heat a large pot or Dutch oven over medium-high heat. Add 1 teaspoon of olive oil, then add the ground beef (or your chosen protein like ground turkey or chicken). Cook the meat, breaking it up with a wooden spoon or spatula as it browns, for about 6-8 minutes. Make sure to cook it thoroughly until there’s no pink left and it’s nicely browned all over.
- Why It’s Important: Browning the meat creates a deep, rich flavor, thanks to the Maillard reaction, which enhances the overall taste of the soup. If you skip this step or don’t brown the meat enough, you might miss out on some of the savory depth that makes this soup so delicious.
Tip: If you’re using ground beef with a higher fat content (like 80/20), you may want to drain some of the excess fat after browning to avoid a greasy soup. On the other hand, if you’re using a leaner meat like ground turkey, you likely won’t need to drain any fat.
Step 2: Sauté the Onions and Garlic

Once the meat is browned, push it to one side of the pot or remove it temporarily. In the same pot, add the diced onions and cook them in the rendered fat (or a little extra olive oil if needed) for 3-4 minutes, until they become soft and translucent. Add the minced garlic and cook for an additional minute, stirring frequently to avoid burning the garlic.
- Why It’s Important: Cooking the onions and garlic until soft releases their natural sweetness and builds the aromatic base of the soup. Garlic, when cooked just right, adds a fragrant depth, but be careful not to overcook it, as burnt garlic can turn bitter.
Tip: If you like extra flavor, you can add diced bell peppers or jalapeños during this step for a more robust veggie base. Cook them alongside the onions for about 4-5 minutes until softened.
Step 3: Add the Taco Seasoning

After the onions and garlic are softened, return the browned meat (if removed) to the pot. Sprinkle in the packet of taco seasoning (or your homemade blend) over the meat and vegetables. Stir everything together, ensuring that the seasoning fully coats the meat and vegetables. Let it cook for 1-2 minutes to allow the spices to bloom and fully integrate into the dish.
- Why It’s Important: Cooking the taco seasoning with the meat and vegetables before adding any liquid enhances the spices’ flavors. This step helps the spices become more fragrant and evenly distributed throughout the soup. It also prevents the spices from tasting raw or flat.
Tip: If you’re using homemade seasoning, you can customize the spice levels to your preference. Add a pinch of cayenne pepper for extra heat or reduce the chili powder for a milder soup.
Step 4: Add the Tomatoes, Beans, Corn, and Broth
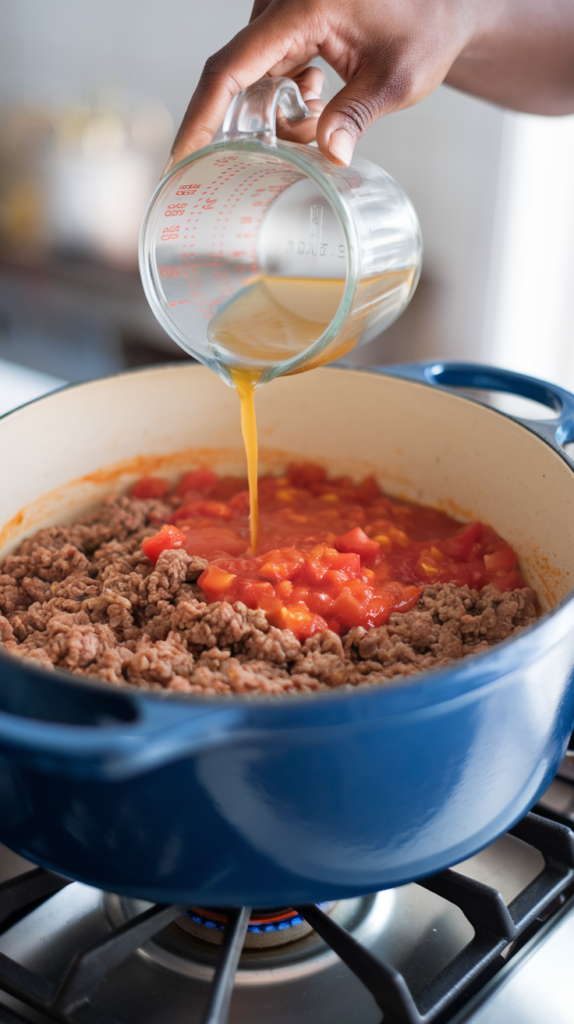
Next, pour in the canned diced tomatoes, tomato sauce, and broth (chicken, beef, or vegetable depending on your preference). Stir to combine all the ingredients.
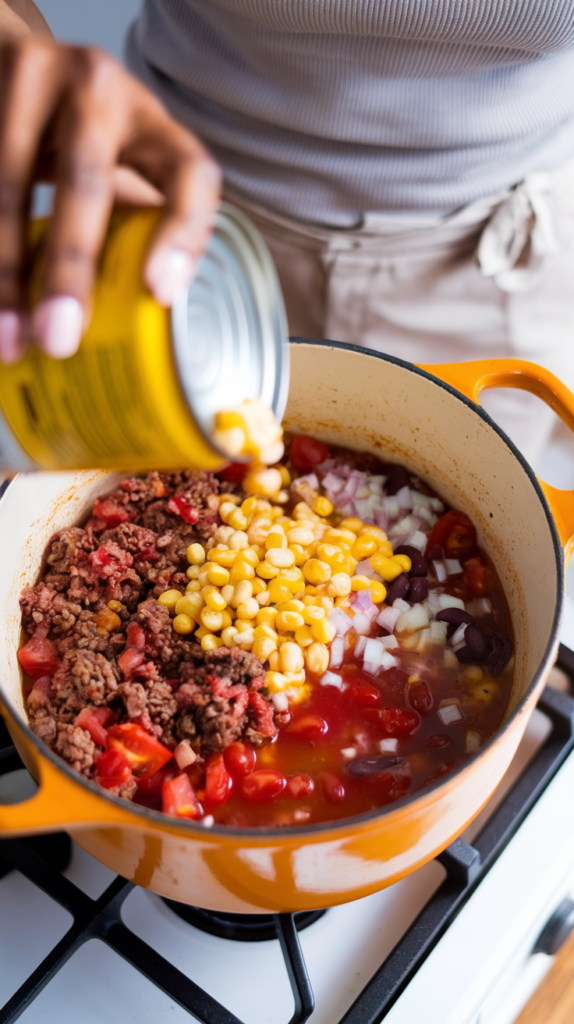
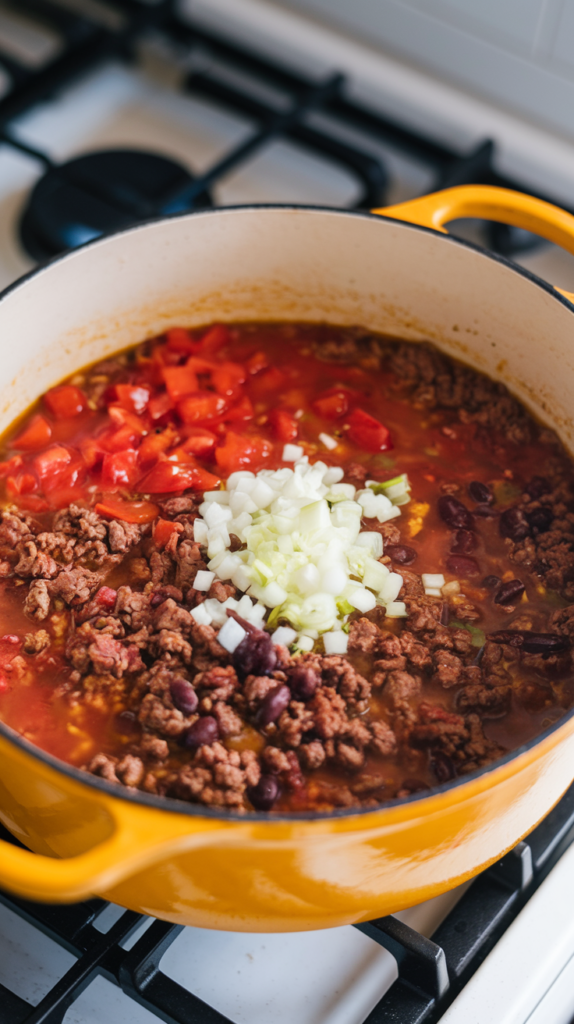
Add the drained and rinsed beans (black beans, pinto beans, and/or kidney beans), as well as the corn. Stir everything together so that the beans, corn, and tomatoes are evenly distributed in the pot.
Bring the mixture to a gentle boil over medium-high heat, then reduce the heat to low and let it simmer.
- Why It’s Important: Simmering the soup allows the flavors to meld together and develop over time. The beans absorb the seasoning, while the corn adds a subtle sweetness that balances the spices. The broth helps bring everything together, giving the soup its signature consistency.
Tip: If you want a thicker soup, use less broth or let the soup simmer uncovered for a bit longer to reduce the liquid. For a thinner, soupier consistency, add more broth or a splash of water.
Step 5: Simmer and Adjust Seasonings
Once all the ingredients are in the pot, let the soup simmer for about 15-20 minutes. Stir occasionally to prevent anything from sticking to the bottom.
Taste the soup after it has simmered and adjust the seasoning as needed. You may want to add a little extra salt, pepper, or even more taco seasoning depending on your taste.
- Why It’s Important: Simmering the soup gives the spices and ingredients time to blend together, creating a more cohesive flavor. It also softens the beans and allows the corn to soak up the broth, resulting in a well-rounded, flavorful dish.
Tip: The longer you let the soup simmer, the more the flavors will develop. If you have time, let it simmer for an extra 10-15 minutes for an even richer flavor. Be careful not to overdo it, though, as the beans can become too soft if cooked for too long.
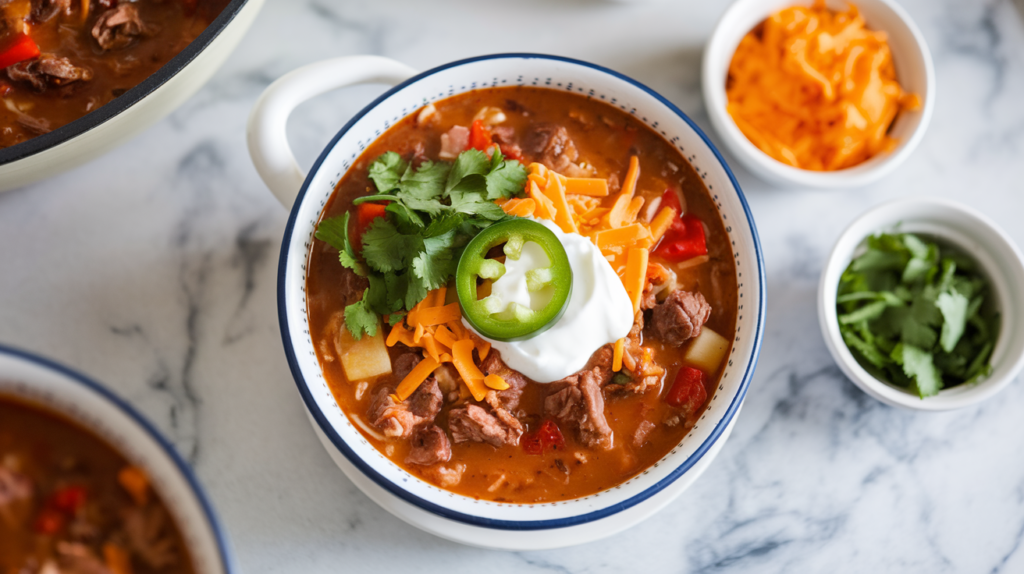
Step 6: Serve and Garnish

Once the soup has simmered and reached your desired consistency, it’s ready to serve. Ladle the taco soup into bowls and add your favorite toppings.
- Topping Suggestions:
- Shredded cheese (cheddar, Monterey Jack, or a Mexican blend)
- A dollop of sour cream or Greek yogurt
- Sliced avocado or a spoonful of guacamole
- Chopped fresh cilantro for brightness
- Sliced jalapeños for an extra kick
- Tortilla chips or strips for crunch
- A squeeze of fresh lime juice to add a tangy, fresh note
Tip: Serve the soup with a side of cornbread or over a bed of rice to make it even more filling!
Variations & Substitutions
One of the best features of taco soup is its flexibility. While the classic version is always a hit, this dish can be easily customized to suit different dietary needs, flavor preferences, or whatever ingredients you have on hand.
Protein Alternatives
The standard taco soup recipe typically uses ground beef, but there are plenty of other protein options that work just as well, depending on your taste, dietary requirements, or even what you have in your fridge.
Ground Turkey or Chicken
These leaner meats are a great alternative to ground beef. Ground turkey and chicken provide a lighter, less fatty base, while still delivering a hearty texture. They absorb the taco seasoning just as well, so you won’t lose any flavor.
- How to Use: Simply substitute an equal amount of ground turkey or chicken (about 1 pound) for the ground beef. Brown it in the same way as the beef, ensuring it’s fully cooked before adding other ingredients.
Tip: Since turkey and chicken are leaner, you may want to add a little olive oil when browning to keep them from sticking and to add extra moisture.
Shredded Chicken
If you have leftover rotisserie chicken or cooked chicken breasts, shredded chicken can be a convenient and delicious alternative to ground meat. It provides a different texture and makes the soup even easier to prepare.
- How to Use: Stir about 2 cups of shredded chicken into the soup after you’ve added the broth and let it simmer along with the other ingredients. Since the chicken is already cooked, it only needs to heat through.
Tip: For extra flavor, use the broth from cooking the chicken as part of the soup’s liquid base.
Vegetarian or Vegan Version
Taco soup can easily be made vegetarian or vegan without sacrificing flavor. By eliminating the meat and adding more beans or plant-based proteins, you’ll still get a filling, protein-packed meal.
- How to Use: Replace the ground beef with a mixture of extra beans (like black beans, kidney beans, or pinto beans) or a plant-based meat alternative, such as crumbled tofu, tempeh, or store-bought plant-based ground “beef” like Beyond Meat.
Tip: For a heartier texture, try using two different types of beans, or add a cup of cooked quinoa or brown rice for more bulk. Be sure to use vegetable broth instead of chicken or beef broth to keep the dish fully plant-based.
Low-Carb/Keto-Friendly Version
If you’re following a low-carb or keto diet, taco soup can still be a delicious and satisfying option with just a few tweaks.
1. Omit the Beans
Beans are a great source of fiber and protein, but they also contain carbohydrates. For a low-carb version, simply leave out the beans and add more meat or vegetables to bulk up the soup.
- How to Use: Increase the amount of ground beef or your chosen protein to 1.5 or 2 pounds to make up for the lack of beans. Alternatively, add more vegetables like diced zucchini, cauliflower, or bell peppers to keep the soup filling without adding extra carbs.
Tip: You can also try adding cooked cauliflower rice to the soup for a low-carb grain alternative. Stir it in toward the end of cooking for a thicker, more stew-like consistency.
2. Adjust the Broth
While the original recipe calls for a generous amount of broth, you can reduce the liquid slightly to create a more stew-like dish that feels more substantial on a low-carb diet.
- How to Use: Use 1.5 cups of broth instead of 2 cups for a thicker, heartier consistency. If you prefer your soup thinner, stick with the full amount of broth and add a bit of cream or cheese to increase the fat content and make it more keto-friendly.
Tip: For a creamy, keto twist, stir in 4 ounces of softened cream cheese at the end of cooking. It will add richness and help thicken the soup without adding carbs.
Spice Level Adjustments
One of the best things about taco soup is its customizable spice level. You can easily make it as mild or as fiery as you like with just a few tweaks.
Want to Make it Spicier?
Here’s How to Add Heat:
- Add more chili powder or swap it for chipotle chili powder, which adds a smoky, deeper heat.
- Use hot taco seasoning instead of regular, or mix in extra cayenne pepper or crushed red pepper flakes for an added kick.
- Add diced jalapeños or serrano peppers during the sautéing process for a fresh, spicy bite.
- Stir in a tablespoon or two of hot sauce or a can of diced green chilies (or spicier Hatch chilies) to up the heat without altering the overall flavor too much.
Tip: If you’re serving the soup to a group, you can keep the soup base milder and offer spicy toppings like fresh jalapeños, hot sauce, or crushed red pepper flakes so that everyone can adjust the heat to their liking.
Want to Make it Milder?
Here’s How to Tone It Down:
- Reduce the amount of chili powder in the taco seasoning and avoid adding extra spicy ingredients like cayenne or jalapeños.
- Use mild taco seasoning, and if you’re making your own seasoning mix, leave out the hotter spices like cayenne and stick to mild spices like cumin and paprika.
- Add more sour cream or Greek yogurt as a topping, as the dairy helps to neutralize some of the heat.
Tip: If you’ve accidentally made the soup too spicy, you can tone it down by adding more broth or tomato sauce, which dilutes the spice. Alternatively, add a small amount of sugar or honey to balance the heat with sweetness.
Broth Options
The choice of broth can have a big impact on the overall flavor of your taco soup, and depending on your dietary preferences or what you have on hand, there are several great options to choose from.
Chicken Broth
Chicken broth is the most common choice for taco soup because it’s light and flavorful without overpowering the other ingredients. It complements the taco seasoning and keeps the soup from feeling too heavy.
Use low-sodium chicken broth if you’re watching your salt intake, and adjust the seasoning to taste.
Beef Broth
For a richer, heartier flavor, beef broth is an excellent alternative. It pairs especially well with ground beef, giving the soup a deeper, more robust taste.
If you’re using beef broth, be sure to taste the soup as it simmers since beef broth can be saltier than chicken or vegetable broth. Adjust the seasoning as needed.
Vegetable Broth
Vegetable broth is a great choice for vegetarians or anyone looking to lighten up the dish. It provides a neutral base that lets the taco seasoning shine while keeping the soup light and fresh.
Tip: If you want a little more richness, try adding a splash of olive oil or a tablespoon of butter to the vegetable broth as it simmers.
Creamy Taco Soup
For those who enjoy a creamier, more indulgent version of taco soup, you can easily add a few ingredients to give the soup a richer, velvety texture.
Add Cream Cheese
Cream cheese melts into the broth, adding a smooth, creamy texture and a slight tang that complements the taco seasoning.
- How to Use: Stir in 4 ounces of softened cream cheese after the soup has simmered. Let it melt completely, stirring occasionally, until the soup is creamy and thickened.
Tip: Make sure the cream cheese is softened before adding it to the soup to avoid lumps. You can also whisk it in a small bowl with a bit of broth to create a smooth mixture before adding it to the pot.
Stir in Sour Cream
Sour cream not only adds a creamy texture but also gives the soup a slight tanginess that balances the richness of the meat and beans.
- How to Use: After the soup has finished simmering, remove it from the heat and stir in ½ cup of sour cream. This will create a velvety, creamy texture without overpowering the spices.
Tip: For a lower-fat version, you can use Greek yogurt instead of sour cream. It will still add creaminess and tang, but with fewer calories and more protein.
Storage, Reheating & Freezing Tips
One of the great things about taco soup is how well it stores and reheats. It’s the kind of dish that often tastes even better the next day, as the flavors continue to meld and develop. Whether you want to store leftovers for the week or make a large batch for future meals, taco soup is the perfect make-ahead dish.
In this section, we’ll cover the best ways to store, reheat, and freeze your taco soup to ensure it stays fresh and delicious.
Storing Taco Soup in the Refrigerator
Taco soup is an ideal meal for batch cooking because it keeps well in the fridge for several days. Proper storage ensures the flavors remain intact and the ingredients maintain their texture.
How to Store Leftovers
Once the taco soup has cooled down to room temperature, transfer it to an airtight container. Be sure to leave a little room at the top of the container, as the soup may expand slightly as it cools. Seal the container tightly to prevent any air from getting in, which helps maintain freshness.
- Storage Time: Taco soup will keep well in the refrigerator for up to 4-5 days. After that, the flavors may start to fade, and the ingredients may lose some of their texture.
Tip: If you’re storing a large batch of soup, consider dividing it into individual portion-sized containers. This way, you can easily grab a single serving to reheat when you need a quick meal.
Avoiding Soggy Toppings
While taco soup stores well, the toppings don’t. Ingredients like tortilla chips, sour cream, and avocado can become soggy or lose their texture if stored with the soup.
- How to Store: Always store toppings separately from the soup. For example, keep tortilla chips or strips in a sealed bag or airtight container, and refrigerate fresh toppings like sour cream, cheese, and avocado in their own containers. Add them fresh when you reheat the soup.
Freezing Taco Soup
Taco soup is a fantastic freezer-friendly meal, making it perfect for meal prepping or saving leftovers for later. It freezes exceptionally well and can be stored for several months with minimal loss in flavor or texture. Freezing it properly ensures you always have a hearty, homemade meal ready when you need it.
How to Freeze Taco Soup:
Allow the soup to cool completely before freezing. Once cooled, transfer the soup into freezer-safe containers or heavy-duty freezer bags. If using bags, be sure to squeeze out as much air as possible to prevent freezer burn.
- Portion Control: For easier reheating, consider freezing the soup in individual portions. This allows you to thaw only what you need rather than defrosting an entire batch.
- Storage Time: Taco soup can be frozen for up to 3 months. After that, the quality may start to decline, though it will still be safe to eat.
- How to Label: Use freezer-safe labels or a permanent marker to note the date you froze the soup. This makes it easy to track how long it’s been stored and ensures you consume it within the recommended time frame.
Freezing Tips:
- Avoid Overfilling: When using containers, leave some room at the top because liquids expand when frozen. This prevents the container from cracking or bursting during the freezing process.
- Separate the Toppings: Just like with refrigeration, avoid freezing toppings like cheese, avocado, and tortilla chips with the soup. Freeze the soup base only, and add fresh toppings once you’ve reheated it.
- Use Portions: If you’re planning to freeze the soup in large batches, consider using silicone molds or muffin trays to freeze the soup in smaller, easy-to-thaw portions. Once frozen, pop them out and transfer to a freezer bag for convenient portioning.
Reheating Taco Soup
Reheating taco soup is a breeze, and there are multiple methods depending on your preference or available equipment. The key is to heat it evenly to avoid overcooking any ingredients, especially the beans or vegetables.
1. Stovetop Reheating:
The stovetop method is best for larger portions or if you want to maintain the texture of the soup. Pour the soup into a pot and reheat over medium heat, stirring occasionally to prevent sticking. Heat the soup until it’s warmed through, about 5-10 minutes, depending on the amount.
- Tip: If the soup has thickened while stored in the fridge, you may need to add a splash of water or broth to thin it out. Start with ¼ cup and add more as needed until you reach your desired consistency.
2. Microwave Reheating:
For a faster option, you can reheat taco soup in the microwave. Place the soup in a microwave-safe bowl and cover it with a microwave-safe lid or plate to prevent splatters. Heat on high in 1-minute intervals, stirring between each interval to ensure the soup heats evenly. Continue this process until the soup is hot, usually 2-3 minutes depending on the portion size.
- Tip: If you notice the soup drying out in the microwave, add a tablespoon of water or broth before reheating to maintain its moisture.
3. Reheating Toppings:
As mentioned earlier, toppings like tortilla chips and sour cream should be added fresh after reheating the soup. Microwaving or cooking the toppings can make them lose their texture or flavor.
- How to Reheat: If you’re using shredded cheese, you can sprinkle it on the soup just before the last 30 seconds of reheating, so it melts without becoming too greasy. For crunchy toppings like tortilla chips, add them right before serving to keep them crisp.
Hearty Taco Soup Recipe


Hearty Taco Soup
Description
This taco soup recipe brings all the best elements of a traditional taco into one convenient, easy-to-make dish. It’s easy for all cooking levels and makes for a great Fall or Winter meal.
Soup Ingredients
Topping Ingredients (Optional)
Instructions
- Heat a large pot or Dutch oven over medium-high heat. Add 1 teaspoon of olive oil, then add the ground beef (or your chosen protein like ground turkey or chicken)
- Cook the meat, breaking it up with a wooden spoon or spatula as it browns, for about 6-8 minutes. Make sure to cook it thoroughly until there’s no pink left and it’s nicely browned all over.
- Once the meat is browned, push it to one side of the pot or remove it temporarily. In the same pot, add the diced onions and cook them in the rendered fat (or a little extra olive oil if needed) for 3-4 minutes, until they become soft and translucent.
- Add the minced garlic and cook for an additional minute, stirring frequently to avoid burning the garlic.
- After the onions and garlic are softened, return the browned meat (if removed) to the pot. Sprinkle in the packet of taco seasoning (or your homemade blend) over the meat and vegetables.
- Stir everything together, ensuring that the seasoning fully coats the meat and vegetables. Let it cook for 1-2 minutes to allow the spices to bloom and fully integrate into the dish.
- Next, pour in the canned diced tomatoes, tomato sauce, and broth (chicken, beef, or vegetable depending on your preference). Stir to combine all the ingredients.
- Add the drained and rinsed beans (black beans, pinto beans, and/or kidney beans), as well as the corn. Stir everything together so that the beans, corn, and tomatoes are evenly distributed in the pot.
- Bring the mixture to a gentle boil over medium-high heat, then reduce the heat to low and let it simmer.
- Once all the ingredients are in the pot, let the soup simmer for about 15-20 minutes. Stir occasionally to prevent anything from sticking to the bottom.
- Taste the soup after it has simmered and adjust the seasoning as needed. You may want to add a little extra salt, pepper, or even more taco seasoning depending on your taste.
- Once the soup has simmered and reached your desired consistency, it’s ready to serve. Ladle the taco soup into bowls and add your favorite toppings.

Hi, I’m Tiana – founder of and author here at Where Tiana Travels. I’m a 20-something with a love for all things travel, photography, and food. I have been living abroad for the past 5 years and solo traveling the globe in my free time. I created this blog to share my travel stories and inspire other women to go out and see the world. Read more about me here!